Welcome to the second edition of Frugal Feeds–it’s like Cooking for Dummies but 35% less patronizing. This post is brought to you today by popular demand of my lovely readers who apparently have a hankering for some good old fashioned apple pie. After my flaunting my father’s apple pie on my Instagram account (check it out if you have time, it’s like a cute mini version of Carbon Chic!), I’ve had a few requests to “dish out” the recipe, so here it is.
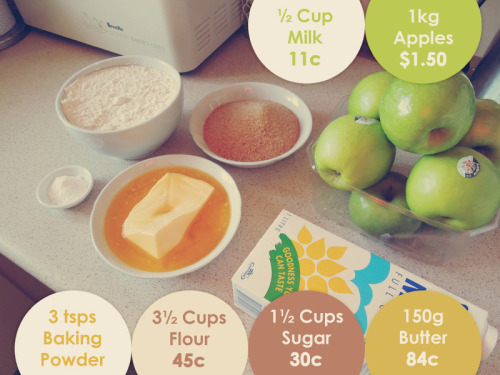
All ingredients can be bought from your local supermarket. I bought most of these things from Aldi because they’re cheaper and my local store has a current special on Granny Smith apples ($1.50 a kilo!), but any store will do, really.
My dad has been trying to teach me this recipe for ages, but since he’s a baker by profession and I’m a professional screw up when it comes to the simplest of recipes, I’ve adapted his version into something a little bit more precise. He calls it his “1, 2, 3” recipe. One part butter, two parts sugar, and three parts flour. Follow that sort of structure and you shouldn’t go wrong, but here are the estimated measurements for the shortbread:
- 3½ cups of flour
- 1½ cups of sugar
- 150g of butter
- 3 teaspoons of baking powder
- ½ cup of milk
The sugar I’m using today is my own “special blend”–half a cup of white sugar and a cup of brown sugar because I’ve apparently run out of white sugar. Ha, ha.. I don’t think it matters what sugar you use–the last time I used only white sugar, the recipe turned out pretty much the same, although my shortbread was a bit drier than it is today. I compensated by adding a bit more flour to my recipe for today (that’s a bit more on top of the 3½ cups needed for the recipe) so the shortbread would come together properly.
As for the butter, I have absolutely nuked this stuff in the microwave; I’m an impatient person so I didn’t feel like waiting, although what the sensible chef should be doing instead is melting at 10 second intervals and stirring inbetween to stop the butter from separating. I, uhm, don’t actually notice a difference from using separated butter in the recipe versus using good butter, but Google tells me that apparently your dessert will turn out more greasy if you do it my way, so maybe patience is a virtue when it comes to things like these. Anyways, carrying on–!
Click “more” to read on (the following parts are a bit image-heavy):
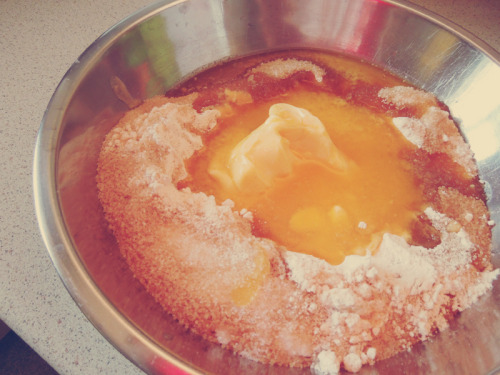
Just mix all the ingredients listed above together (except for the milk, leave that aside for a second) in a bowl with your hands or if you’re not dirt poor like me, perhaps some sort of batter mixing machine would be a better idea. Should you choose to use your hands, make sure you wash them beforehand. Duh.
It looks a bit intimidating to stick your hands in a bowl like that the first time you do it, but it’s really not so bad. Everything combines pretty quickly and turns into a doughy consistency, so it’s not like you’ll be greasing your hands up to no end. When you get a crumbly sort of texture, you’re going to want to add that half cup of milk into your dough and knead that through as well. Knead until you’re a bit tired and puffed out, or in case of super-fit people out there, just knead until you can roll it into a non-sticky ball that can support its own shape and not sag down on you.
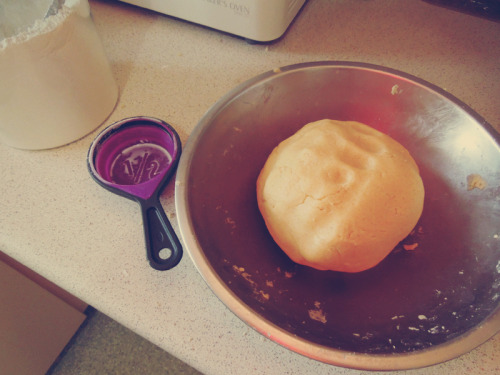
The only sort of way I can describe the firmness of the ball is to tell you to slap your butt and if the ball is about as firm as your butt, you’re doing okay. Try not to over-knead it though, because as my dad warns me, “You’ll end up making the shortbread too short” (what does that even mean??). It sounds pretty ominous though, so I sure don’t wanna find out.
Wrap up your ball and place it into the fridge for about an hour, hour and a half.
Meanwhile, we’ll move onto the apples.

Depending on how deep your pie dish is, you’re going to want about 8 good-sized apples for this. It doesn’t really matter which variety of apple you choose. Obviously, Granny Smith apples are preferable when it comes to making apple pie, but I gotta tell you, when my dad used his leftover apples on the pie he baked me (some red delicious, some lady gala, some granny smith), it still tasted equally delicious. Maybe when I’m a seasoned apple pie baker, I’ll be able to tell the difference, but as someone who has been eating frozen Sara Lee pies for all her life, any homemade apple pie is better than frozen apple pie by the longest shot.. ever.
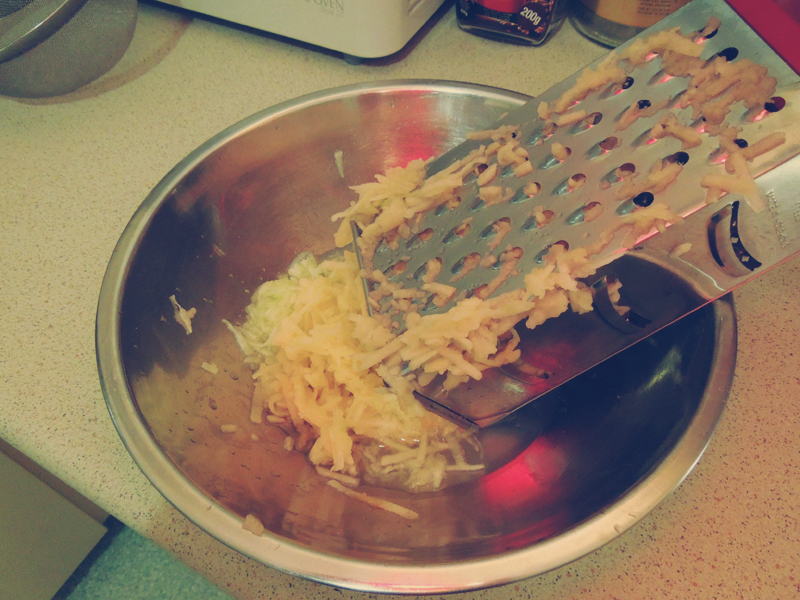
Anyways, I’m going off on a bit of a tangent.. I grated about 6 apples using the side of the grater shown. Hold the apples by the core and don’t be in too much of a rush or you’ll slice some skin into your pie, and I’m not sure even the most experienced of bakers could pull that off in a dish. The remaining two apples I save for later. This is a personal preference as I like a bit of juicy fresh crunch in my pie, but by all means, if that doesn’t sound like something you’d enjoy, feel free to continue grating the rest of them into the bowl.
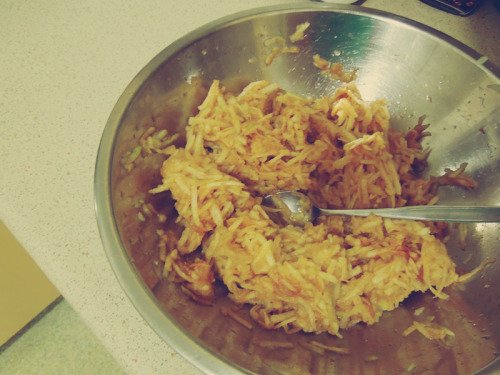
After you’re done, you can do one of two things, you can strain the juice out of the apples before you add extra ingredients or you can do it after. I prefer to do it before because I then put the apple juice in a glass and drink it, but my father prefers to do it afterwards because the juice will have added taste of cinnamon and sugar and with thusly be 150 times worse for your teeth (probably, I’m not a dentist though). It’s up to you what you’d like to do.
I usually do this by eye, but I add about 2-3 teaspoons of cinnamon to the rendered apples and a good handful of sugar (these were the words my father passed onto me and I actually stick my hand into the sugar for this so I can’t provide a more precise measurement). Mix this thoroughly and then just let it sit until your dough in the fridge is ready for you.

Arrange your workplace, clean up some dishes.. Sprinkle some flour on top of your newly sanitized workbench and divide your shortbread into two hunks. You’ll want to roll this out to about 4-5mm thickness.
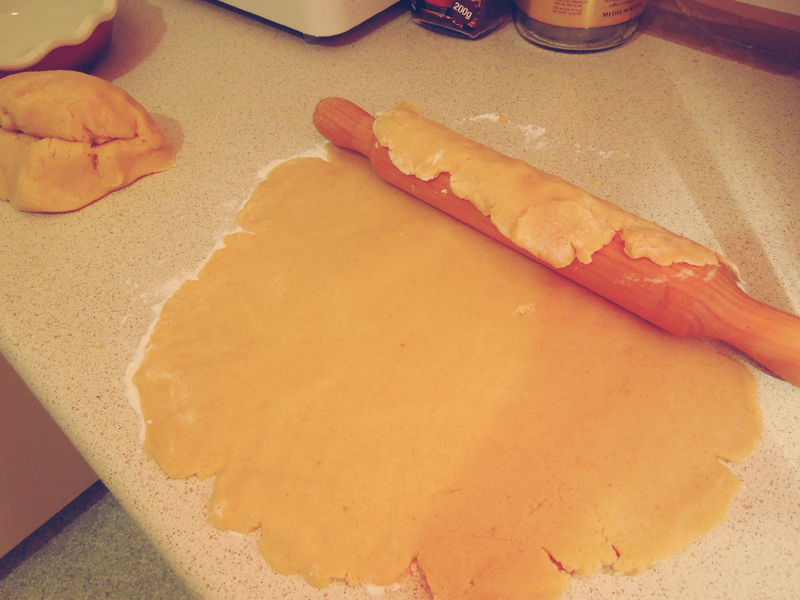
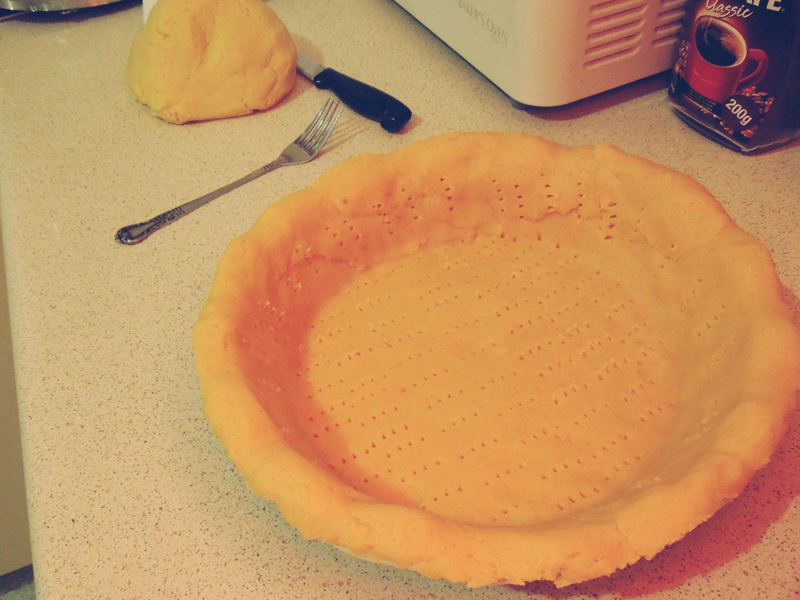
The purpose of using flour over your workbench is to prevent the shortbread from sticking to it and/or tearing. At this point, my shortbread turned out pretty sticky because I didn’t add enough flour, so it was quite an experience trying to roll it onto the rolling pin and successfully onto the dish without breaking. Luckily, even if your shortbread does break, you can easily patch it up with your fingers–doesn’t matter how messy you are with this because nobody will be able to see the bottom anyways, ahaha! Trim off the sides with a knife and add the off-cuts back into the other lump of shortbread you have there.
Give the base a good two dozen (or more) stabs with your fork and put it into the preheated oven at 200 degrees (Celsius) for 15 minutes.
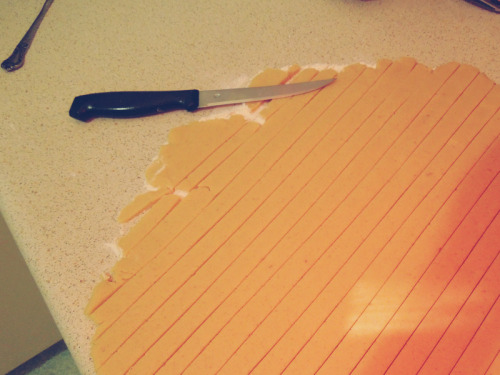
Meanwhile, roll out your leftover shortbread in the same fashion as you did the other side. Don’t roll it out too thin or it’ll break and you definitely don’t want that sort of thing to happen for this stage! Cut your shortbread into slices about 1½ cm thick, or, I guess, however thick you want, really. It doesn’t matter and it’ll only affect the visual look of your pie. Of course, if you’re lazy (like me, but more so) you can skip this part and just lay down a blank layer of shortbread over your pie, it’ll still taste good (but don’t forget to poke a big hole in the middle of it to let the steam out if you’re gonna do that!).
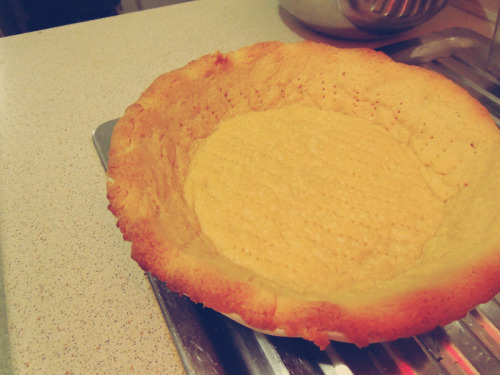
It should be 15 minutes by now so take your pie base out. Doesn’t it look awesome? It should still be raw but a little golden around the edges. If it’s not, leave it in the oven until it is.
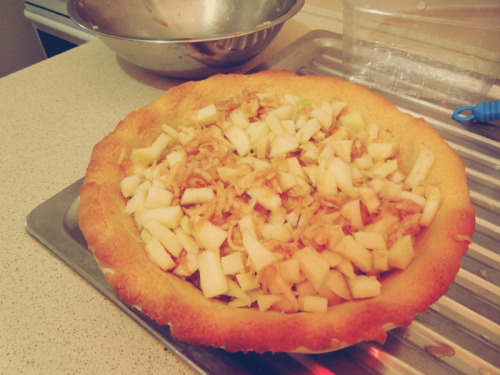
You don’t need to wait until the pie cools–I didn’t, anyways–before putting your filling in the middle. Because I like a bit of added crunch and freshness to my pie, I’m slicing up two remaining apples into rough cubes about 1cm by 1cm and tossing it into the pie as well. Before you put your filling in, just grab handfuls of it and squeeze the juice out into the bowl before you transfer the apple to the pie. Do this properly or you’ll have a wet pie. You don’t want a wet pie.
Now you can either drink your cinnamon-y, sugar-y, apple-y juice that remains or make someone else drink it. Both options has its perks.
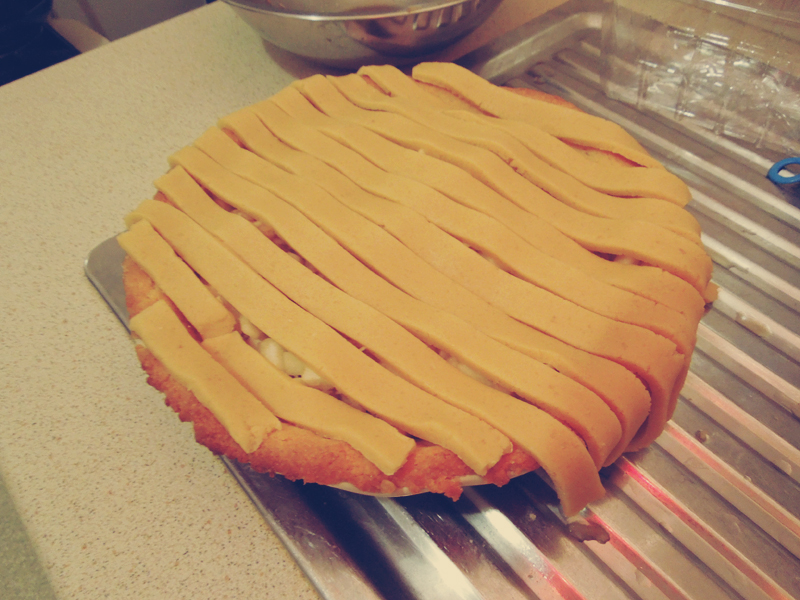
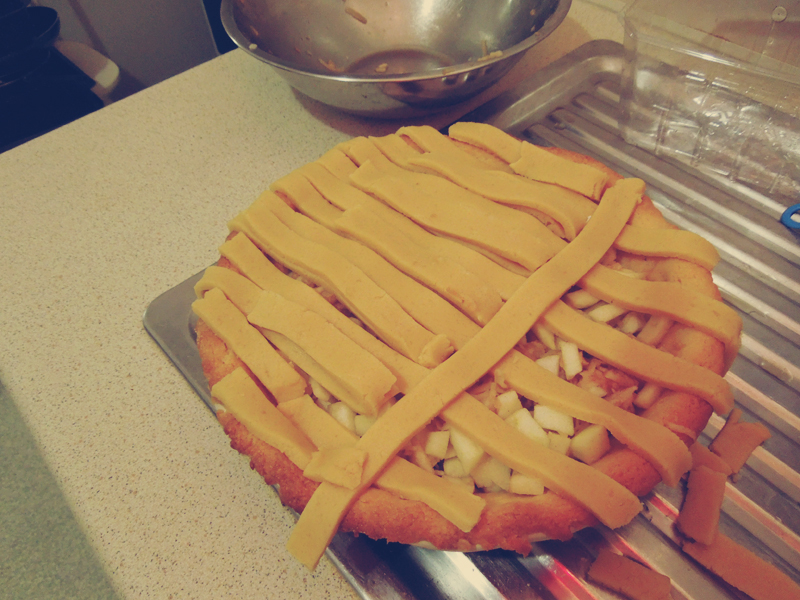
A lot of you seemed to be in awe that I made such a nice pie top, but once you learn how to do it, it’s pretty much the easiest thing in the world. Lay out alternating strips (this means don’t just grab all the long ones that you’ve cut out, alternate!) of shortbread in a parallel fashion across your pie. Now take every second strip and fold it back (GENTLY OMG, GENTLY) to about halfway and lay a strip of shortbread across like you see in the above photo. Now unfold the strips back to where they were and repeat that step with the opposite strips.
If you’re still confused, try Googling.

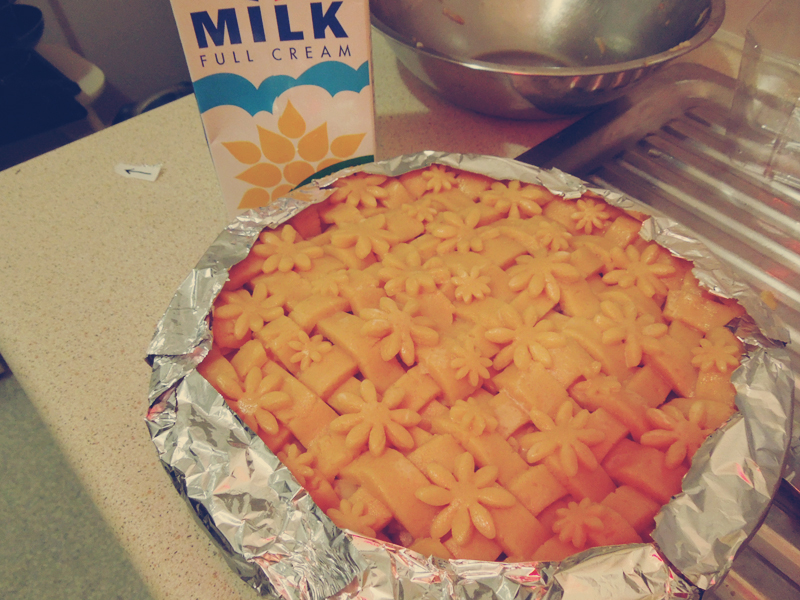
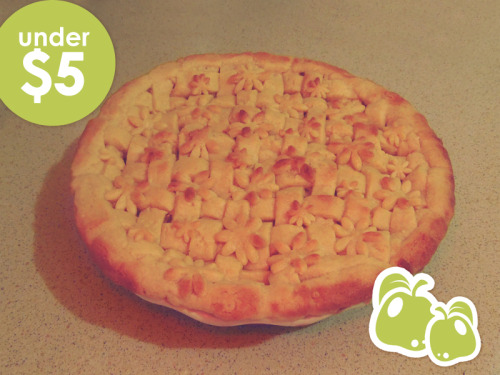
You’re done with the lattice, YAY! Take some remainder strips and press them onto the edges, for the sake of neatness, mostly. If you have a lot of shortbread left, you can do silly things like cut out flower shapes and stick them onto the top, but be careful about the thickness of your top, you don’t really want raw pastry.
Take a few spoonfuls of milk and use a brush to brush it over the top so there’ll be a nice golden colouring to the top. After you’re done, wrap up the edges with aluminium so they don’t burn. My dad uses the pie crusts burning as a good indicator of whether the pie is cooked or not but that kind of renders the edges inedible and this pie will be so delicious that it will pain you to dispose of burnt edges.
Pop the pie back into the oven and let it cook for around 45 minutes. Ideally, you’ll want a nice golden colouring on top, and then you’ll know that it’s ready.
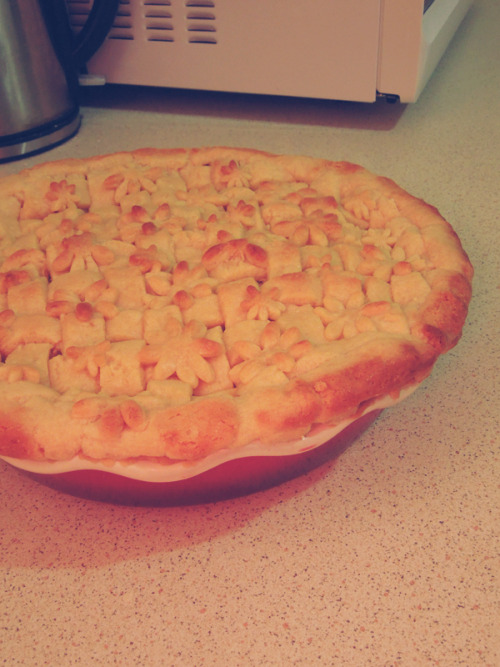
Voila! There you have it–Demi’s family apple pie for less than the cost of an apple danish at Brumbies.
I hope you enjoyed this edition of Frugal Feeds, and please comment back to tell me if you tried this recipe out and what you thought!
2 Comments
Thanks so much Demi, this is the greatest apple pie I’ve ever eaten.
<3