
Welcome to part 1 of the B6413 Sewalong! If you’re joining us from Facebook, good to see you, and if not, you should come and join our Sewalong Group to keep up with everyone’s progress. Otherwise, feel free to follow Carbon Chic for updates, or post on Instagram, etc. with the tag #b6413sewalong :)
Let’s begin!
The first thing anyone should do with any pattern they are unfamiliar with is construct something called a muslin. This is a test garment made with similar (much cheaper, hopefully) fabric. It will let you see whether you will encounter potential fitting issues as you go along. Always, always, always trace your pattern onto tracing paper from the original pattern sheets; don’t just cut into it like an animal. You may need those other sizes later depending on how (un)successful your muslin is.
Finished garment measurements
Everyone starts off tripping over pattern sizes. That’s a universal fact. The good thing is that once you learn the basics, you never forget. The rule of thumb is that the numbers on the pattern envelope don’t correspond to your ready-to-wear, store-bought clothing sizes, or actually anything else either, sorry. They suck. Your best bet is to remember which size is roughly yours once you’ve made something from that brand of patterns and then proceed to ignore the table on the back of the envelope for the rest of your life.
For this pattern (and every pattern really, but this one in particular), it’s important to look out for the finished garment measurements. These are printed on every modern pattern and you’ll find them on the tissue pattern pieces themselves, for future reference.
But Demi, how do we know what size to buy if we haven’t bought the pattern yet? Here are the finished garment measurements all compiled in one spot for you:
Inches
| Size | 6 | 8 | 10 | 12 | 14 | 16 | 18 | 20 | 22 |
| Bust | 34″ | 35″ | 36″ | 37.5″ | 39.5″ | 41.5″ | 43.5″ | 45.5″ | 47.5″ |
| Waist | 25″ | 26″ | 27″ | 28.5″ | 30.5″ | 32.5″ | 34.5″ | 36.5″ | 38.5″ |
Centimetres
| Size | 6 | 8 | 10 | 12 | 14 | 16 | 18 | 20 | 22 |
| Bust | 85 | 88 | 92 | 94 | 100 | 105 | 110 | 116 | 121 |
| Waist | 63 | 66 | 68 | 73 | 77 | 82 | 87 | 92 | 97 |
I excluded the hip measurements because we’re making a full-skirted version, but those will be on the tissue pieces for the skirt too if you’re going with the original pattern. In either case, it’s much easier to fudge the numbers for your hips than it is to do for your bust.
To pick your size
Measure the waist of a skirt or dress you own that you know fits well. That’s the waist size you want to match to the table above.
Now measure your bust using a tape measure, without a bra on. If it helps, lie down on the bed when you do this so gravity isn’t affecting the result too much. Don’t add any ease to the bust measurement. Boobs are like liquid, you want them to be poured into this dress, not slosh around in it.
The pattern pieces
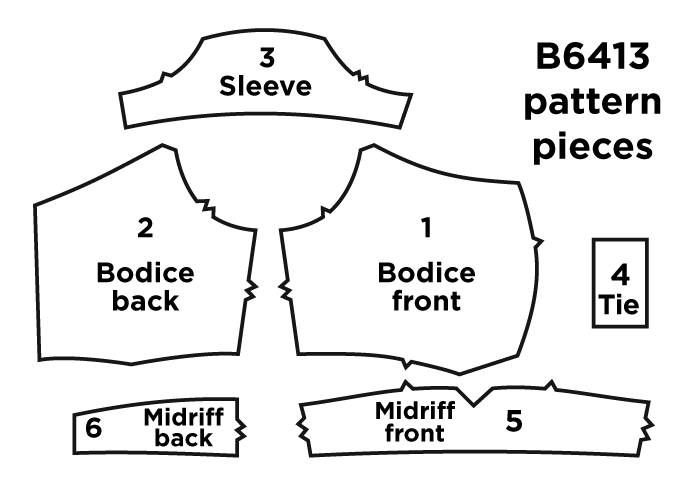
The muslin
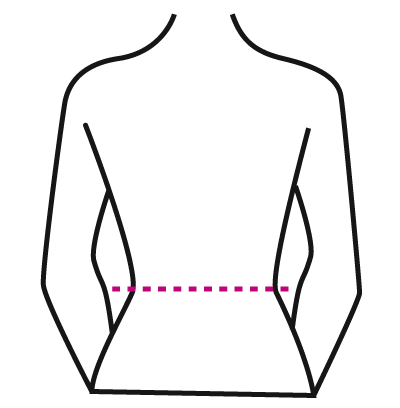
You will need a muslin to assess your fitting issues. You don’t need a lining for this version, so don’t cut one. When you’ve cut your muslin pieces out, trim the seam allowances as pictured, only on the dotted lines:
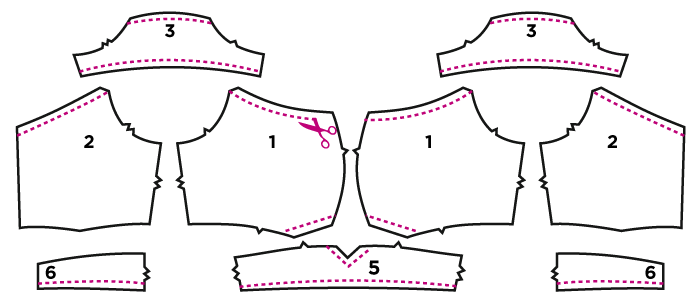
You will have to move the markings accordingly. Obviously don’t do this to your final version. I find trimming seam allowances on your muslin gives a better indication as to how the dress is going to sit on you and exactly how much skin you’re going to be showing. It will also greatly help with assessing the correct waistline. If you have another preferred method like notching or folding over the fabric, feel free to do whatever you like, this isn’t a compulsory step.
Here’s a quick and messy rundown on how to sew the muslin together:
- Sew up the darts for the back
- Sew the back to the back midriff
- Sew the bust pieces together at the centre front
- Sew the bust pieces to the front midriff (match the circle markings)
- Sew the sleeves on (observe markings to make sure they’re sewn on the right way)
- Sew the sides together
- Sew a zip into the back (Optional and may not be necessary if you have a helper to pin you into your muslin)
- Gather the middle down using zig zag stitch (I personally didn’t do this, I just bunched it all together into the tie). On every pattern, regardless of size, the bodice is gathered down into 2″ (5cm). This is important to keep in mind because depending on fit adjustments as follows, this number may have to change.
fitting tips
Slashing
To get the proper fit, you’re going to have to do some hacking at your pattern, or “slashing” as it’s referred to in the industry. Slashing enables you to add or subtract fullness. The pivot point is often the bust apex but because this pattern has such bizarre shapes, I will be doing the majority of the slashing from one side to the other, like this:
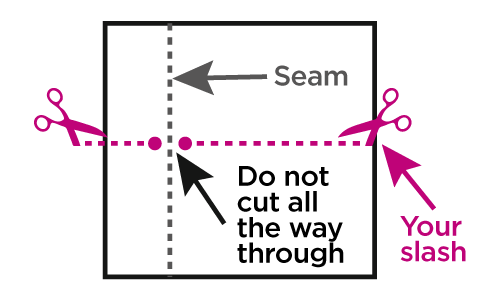
Every time we are slashing and spreading/contracting or pivoting pattern pieces, refer back to this image. We are not cutting all the way through, because whether it’s at the seam or the bust apex, you will always need a pivot point.
Ignore the image if you’re doing something like shortening pattern pieces, you cut all the way through for that.
The neckline
This is an easy one. Want a higher neckline? Make the tie longer. The front panel requires so much gathering to get down to 2 inches wide, that you could slash from armhole to centre bust and spread/pivot your pieces to make this area bigger, but even with a longer tie, I still believe there will still be plenty of gathering.
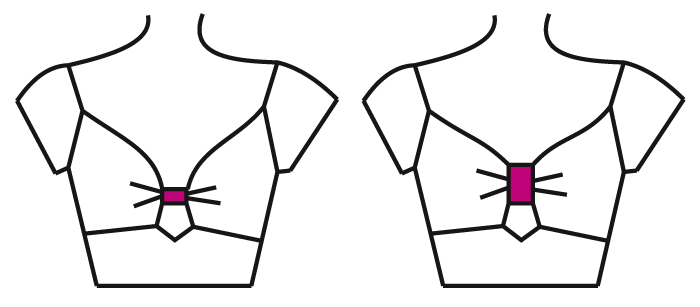
The keyhole
I encountered a funny issue with this pattern as I was constructing my muslin, and that was the shape of the keyhole. For some reason, I had seen many versions of this dress where the top of the “diamond” was stretched out, and this was no different for me in my muslin. I suspect this has something to do with bust size and position because the problem seemed less prominent on more busty ladies.

For those who have cut their muslin and found that they have this similar problem (and want to fix it), this is how to adjust:

Slash from the keyhole to the armhole (pivot point at armhole) and rotate your piece in. You’re trying to collapse the edge of the keyhole so it’s a bit shorter. This will alter the neckline a bit, but it will mean the keyhole is the right shape.
I mentioned I wouldn’t be doing any tutorials on removing the keyhole, but I will try to point you in the right direction. The modification is pretty close to the diagram above, except you have to trim the excess off in a way that leaves you with a continuous line for the bottom of the bodice front instead of one which veers up to make the keyhole.
You will need a longer tie to pull this off, because you’re removing the keyhole. How much is up to you. Sandwich the tie between the midriff and the bodice front before attaching them together and gathering. Once your bodice is gathered down, slipstitch the tie to the lining on the inside. Sorry it’s not super detailed, but hopefully it’s enough to get you started.
The waist
If you’re in-between sizes, you may need to grade the waist up or down. Say your waist is a 10 and your bust is an 8, from the top of the midriff piece, when drawing the sides, you will want to start at an 8 at the top and blend the line to the 10 by the time it hits the bottom, like so (if your pattern piece was a perfect rectangle, which it’s not, so bear with me):

The purple line is your new pattern piece. As you can see, the top right corner starts at 8’s upper right corner, but finishes at 10’s lower right corner. You will need to do this to both front and back midriff pieces.
The bust
Full bust adjustments (FBA)
When you’re constructing your muslin, you will quickly begin to see where you need or lack extra fabric.
The correct way to add fullness in a bodice is via a full bust adjustment (FBA). A full bust adjustment is a technique that makes up for the size discrepancy between the fullest part of your bust and the narrowest part of your chest (upper bust measurement). You can be flat-chested with tiny shoulders and need a full bust adjustment. Similarly, you can have a large chest and broad shoulders and not need a full bust adjustment. It has nothing to do with your waist.
This is a funny pattern in that it doesn’t have a closed-in neckline or traditional set-in sleeves. Luckily, this design seems to do quite well for busty ladies, so definitely try out your muslin first before trying to tackle a full bust adjustment. Don’t immediately skip that step just because you think you might need one based on other garments you’ve sewn, it’s really not the same thing. For reference, I have done an FBA on most patterns to get them to fit, except this one. There were better ways to tackle my particular fit issues than messing with the bust pieces.
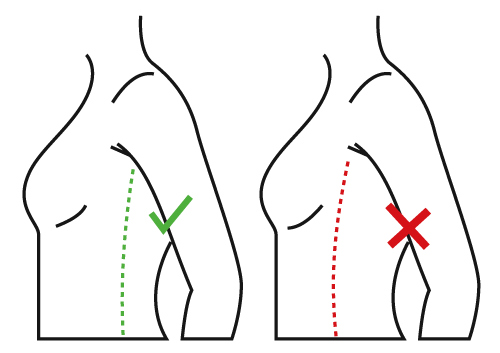
If you’ve tried your muslin for size and really think you need one because your side seams aren’t hitting the correct spot (they should be perpendicular to the ground, directly under the centre of your armpit), these instructions are for you.
Measure around your body at the area above your bust. This is your upper bust measurement. Compare this to the finished garment measurements and pick your bust size based on this measurement now. This will definitely make the bust too small, and probably the sleeves too, but we will deal with that later. The bust is the most important part.
Compare your upper bust measurements with your full bust measurement. Say the difference is 2″, then you will need to add 2″ of fullness to the bodice. There are two mirror pieces for the bust, so you divide this difference by two and you will need a 1″ FBA (for example).
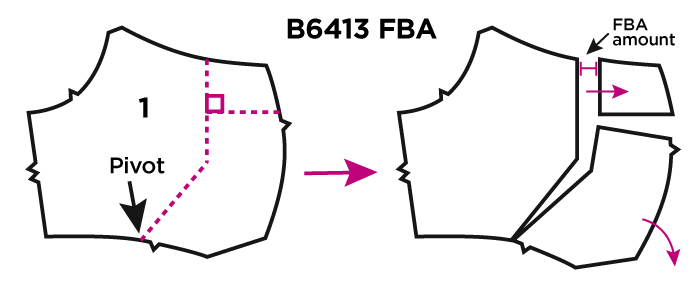
How do we actually do a full bust adjustment for B6413? Draw a line from roughly the middle of the bodice piece’s bottom seam (the one that joins onto the midriff ) to the bust apex. From the bust apex, draw a line straight up to the neckline. Midway on this line, draw a perpendicular line out to the centre front edge. It should make a right angle (as shown above).
Cut along these lines leaving a pivot point where shown. Tape down the largest piece so it doesn’t move (this will be the piece with the armhole). Slide the top corner out the required amount needed for your FBA (in the provided example, this will be 1″). Pivot the bottom corner out to match the position of that little corner in the top. Fill in the gaps with paper and blend between chasms. Your gathered section will end up wider than the original 2″ though, so play this by ear and gather into what you think is most flattering for your own bust, whether it’s 2″ or 4″, etc., and redraft the tie to match this.
At first glance, this FBA looks a bit funny because you are pivoting from the waist instead of the traditional armscye pivot that you do with most FBAs, but I have tested this to make sure that it works, and I’m pleased to say it does. (Testing involved a pushup bra and a pair of gym socks, don’t ask for more details.)
Bust height
It is very important to remember that the seam that joins the bust pieces to the midriff piece must be sitting where your regular bra’s underwire should be.
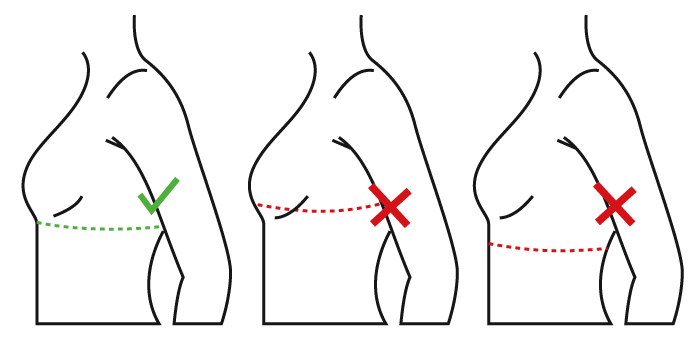
If it’s sitting higher or lower, you will need to slash your pattern pieces.
Don’t forget to measure how much you have taken out or added in, because you will need to do the exact same adjustment to the bodice back. It’s likely the bottom of the midriff won’t hit your waist anymore after you’ve done this (if it does, lucky you!), so read on to find out how to fix this..
Length
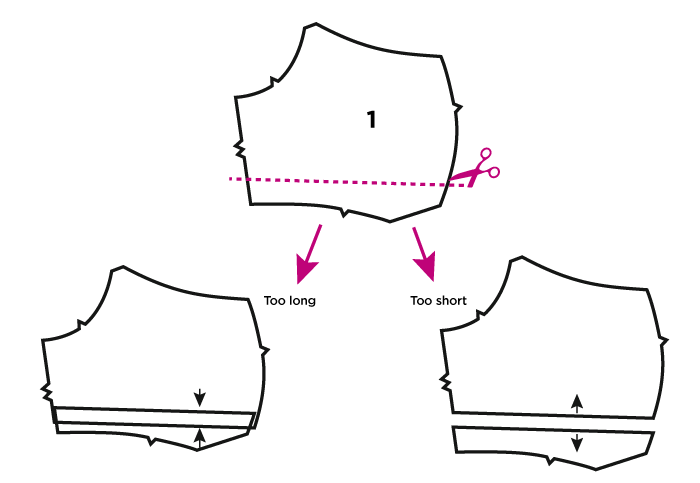
 Short- or long-waisted? Maybe you’re not sure. Depending on what your fit issue looks like, you will have to alter in different ways, or use a combination. If your underbust seam does not sit in the right place (see above), you will need to adjust that first before shortening or lengthening midriff pieces. If that’s all well and done, tie a string around your waist at the smallest part. Your bodice should not extend past this (remember how I suggested cutting the seam allowances off the bottom of your bodice at the very start?), nor should it be hovering above this line.
This modification is easy:

Don’t forget to shorten or lengthen the back midriff pieces by an equal amount as well (not just the front piece).
You can tell that your bodice is too long if there are horizontal wrinkles around your waist. Oftentimes, shortening your bodice will eliminate these wrinkles (provided there are no other fitting issues, like bodice too tight or loose, etc).
Sometimes, you will have wrinkles in the back. A sure sign that your back is shorter than your front. Then you know it’s time for a swayback adjustment.
Swayback adjustment
The same principle applies for any pattern. Your goal is to shorten the back without modifying the front. So you place your pivot point on the side of the midriff back.

If you’re short-waisted WITH a sway back, you will need to combine both of these techniques.
The sleeves
Usually when the shoulder slip off on any dress pattern, that’s a sure sign you’re in need of that magical term, a “full bust adjustment”. This pattern is VERY different as the sleeves are more like straps and there’s no traditional neckline here. So what you want to do is leave the fitting for the sleeves until the end of your fitting process. Nail the fit on the bust and make sure it hugs your ribs snugly. Now you can chop and change your sleeves to your heart’s desire to match the width of your shoulders and arms. I made a flowchart to troubleshoot some common sleeve fitting problems.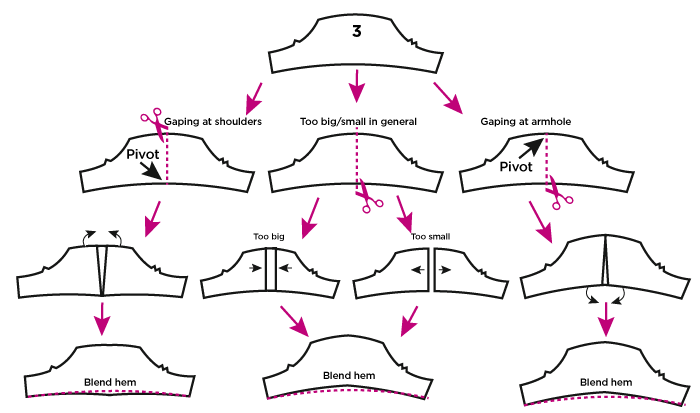
The age-old question for this pattern–off the shoulder or on the shoulder? It’s your choice. My own dress seems to work either way but if I wear it off the shoulder, I have to sacrifice some of the fit around the waist (the whole bodice moves down when the shoulders move down). Depending on your body shape, you may have to pick one or the other and then draft a shape that best works for you. Luckily the sleeves are super simple and only joined in two places to the bodice. As shown above, you can slash and pull and pivot these pieces however you like to get a good fit and the rest of the dress won’t need to be modified to match.
In conclusion
Muslins are important, especially when you’re working in unfamiliar territory. Full skirts you can always fudge, but bodices are a little trickier. But the good news is that once you get this down pat, you can remake this pattern as often as you’d like and it will fit you like a glove every time.
6 Comments
Loved this post! So handy to have instructions pertinent to a specific pattern! I’m still a beginner sewer so I was wondering, once the pattern has been varied to account for a better fit, would you do another muslin to make sure the fit was correct? How would you transfer the changes you’d made to the pattern?
I’m so glad you’ve gotten something out of this sewalong! :D In answer to your question, it REALLY depends on how confident you are as a seamstress. After I’ve marked changes to my muslin and done necessary stitching/unpicking to see if my hypothesis sort of works, I’m very laissez-faire about the rest of the process and just cross my fingers that the final outcome will work out. Usually I take a ruler to my muslin to see how much I modified something and then use the same measurement on the pattern pieces. Like if I’m pinching out excess fabric in a shoulder. I’ll measure how big the pinch is and make sure that much is taken out of my pattern. Or sometimes if I’m doing something like cutting an armhole out more (just as an example because it’s what I’ve been doing the last few days, drama with armholes), I’ll mark with a pen where I think it’s correct on the muslin, then cut out that area, and take that scrap of fabric to my paper pieces and try to trace or mimic what I just did.
Thanks for the amazing tutorial! I have a question with regards to trimming the seam allowance on the muslin – I’ve never done it this way. Why do you trim the seam allowance and once the seam allowances are trimmed off, what “seam allowance” do you use to sew up the muslin?
Hi Maggie, if you note the diagram, you’re not cutting off any seam allowances that are attached to anything :) Only ones that would be attached to the lining.
Wow that was an excellent tutorial! I could actually understand it! ? If you were close I would pay you to teach me one on one! Thank you so much for all your efforts! You’re the best!
You are so kind, thank you! ? It’s my dream to teach sewing one day, so that would be amazeballs!