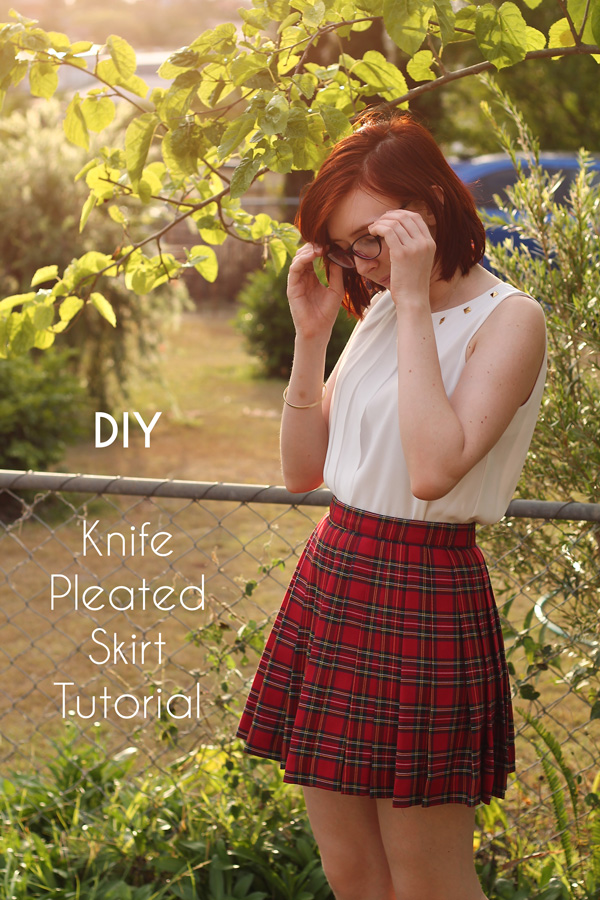
This time around, we’re looking at a slightly different technique to achieve that “schoolgirl chic” look with a knife-pleated skirt (also known as a side-pleated or tennis skirt). I’m using a woven tartan here, but you can use whatever material you prefer for yours.
You will need:
- Sewing machine
- General sewing kit–Scissors, needle, seam ripper, tape measure, regular pins and safety pins
- Something to draw on your fabric with (chalk, pencil, pen, etc.)
- Woven fabric (we’ll get to how much in a bit)
- Matching thread
- Regular zip (At least 15cm long)
The measurements
First thing you want to do is make sure you’ve bought enough fabric! There are two types of knife-pleated skirts you can make, one with deep pleats and one with shallow pleats. I think deep pleats look slightly nicer on woven fabric like tartan but if you are short on fabric, shallow pleats are just fine.
This is your algorithm:
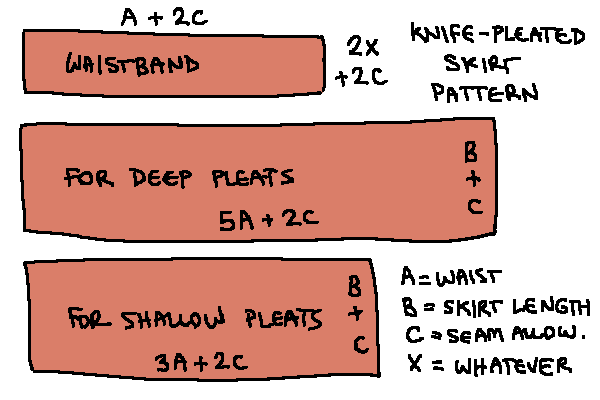
Belt loops, pockets, and lining are optional–for this tutorial, we will cover none of those but if you want to review methods on how to make them, just refer to my box-pleated skirt tutorial.
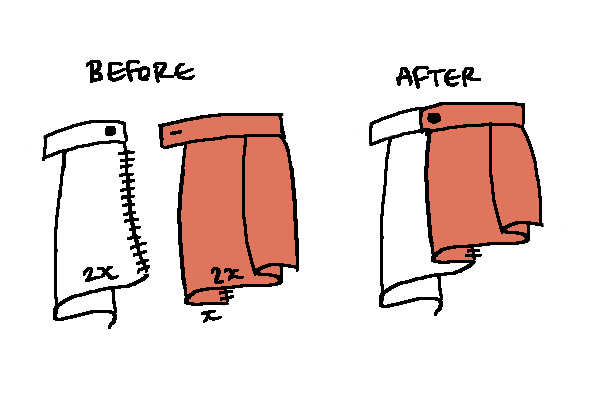
A is your waist measurement. For deep pleats, you want five times your waist measurement (5A), if you want shallow pleats, the total width will be 3A (plus seam allowances). You can split this up into two panels if you want a front and a back, or you can just pleat one continuous strip of fabric. Obviously if you do this, you won’t be able to put pockets in. For the waistband, pick a width that you like best and substitute that in for the x in the diagram.
I wanted a waistband that was a little over an inch thick and since I was sewing a mini skirt and had a piece of fabric that was 180cm x 120cm, I split my fabric into two panels (back and front) with a strip left over for a waistband later on.
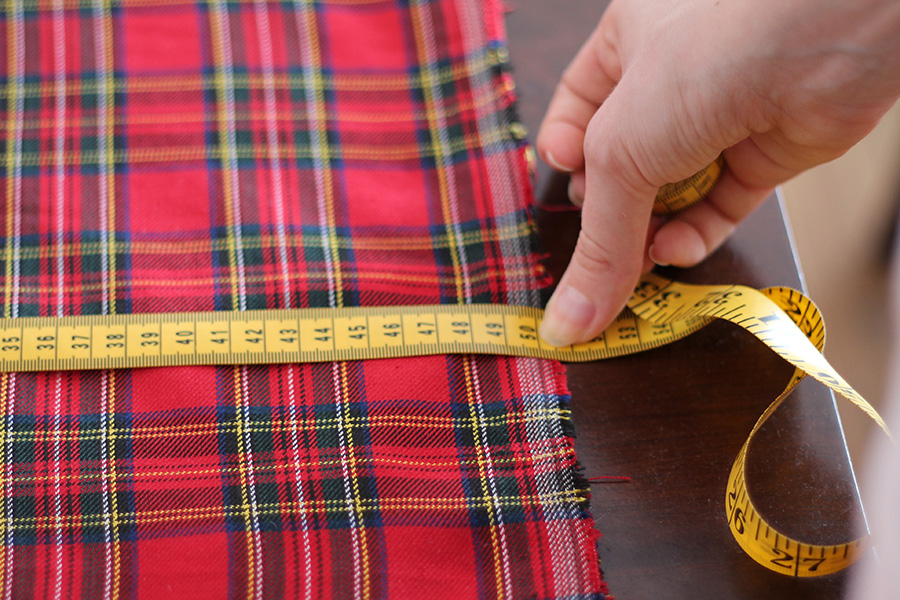
I wanted my skirt to be 40cm long, a pretty decent length for a miniskirt without being too tarty (ha, get it?). I left a good 10cm of hem allowance on the bottom because I wanted the flexibility of being able to let it out a bit later on.
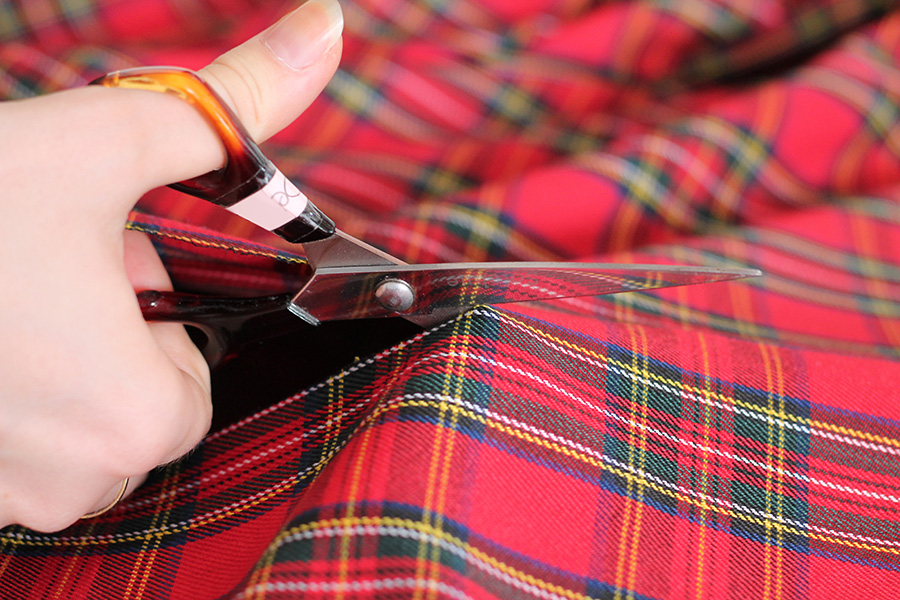
Snip, snip, snip. If you’re using tartan fabric like me, the pattern makes pretty good guidelines!
It is at this stage that if you’re using two rectangles of fabric for your skirt instead of just one long one, you have to straight stitch them together at one end to create one long strip. Ignore this step if you just have one continuous length of fabric for the body of the skirt.
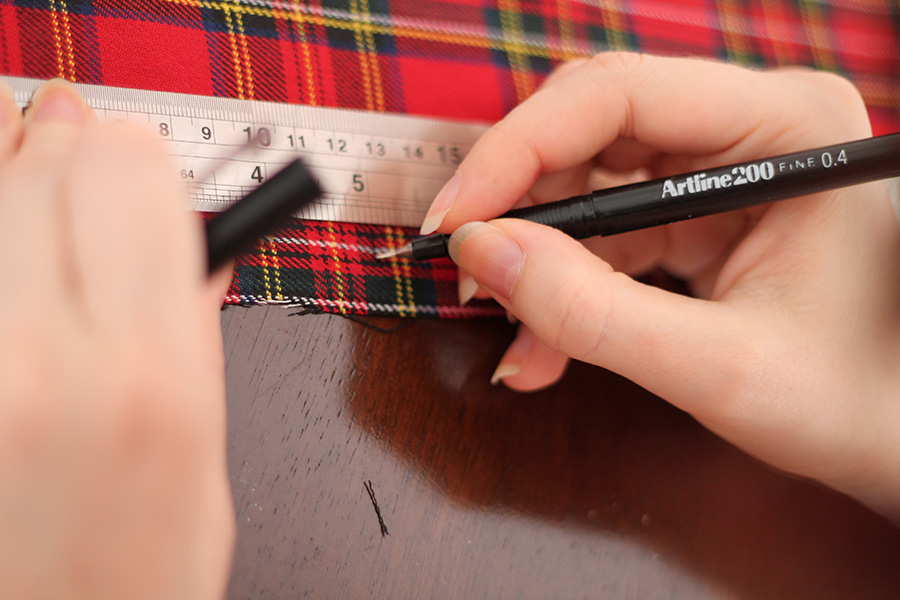
Inch-wide pleats are pretty cool and easy to keep track of, but adjust for taste – you can make them 2 inches for half as much work, or half an inch if you’re a masochist with psychopathic tendencies.
Remember that for each pleat’s width, there’s 5x the amount of fabric behind it, and you want to pick a number that is easily divisible by your waist measurement, so all your pleats are evenly-sized and you’re not left with one giant or mini pleat at the back next to your zipper.
My waist is 26 inches, so my skirt has 26 inch-wide pleats, so roughly 130 inches of fabric went into the skirt. Yep, that’s about 3.3m of fabric! Mark off your pleats along the prospective waistband of the skirt because it’s going to be covered by a waistband later on.
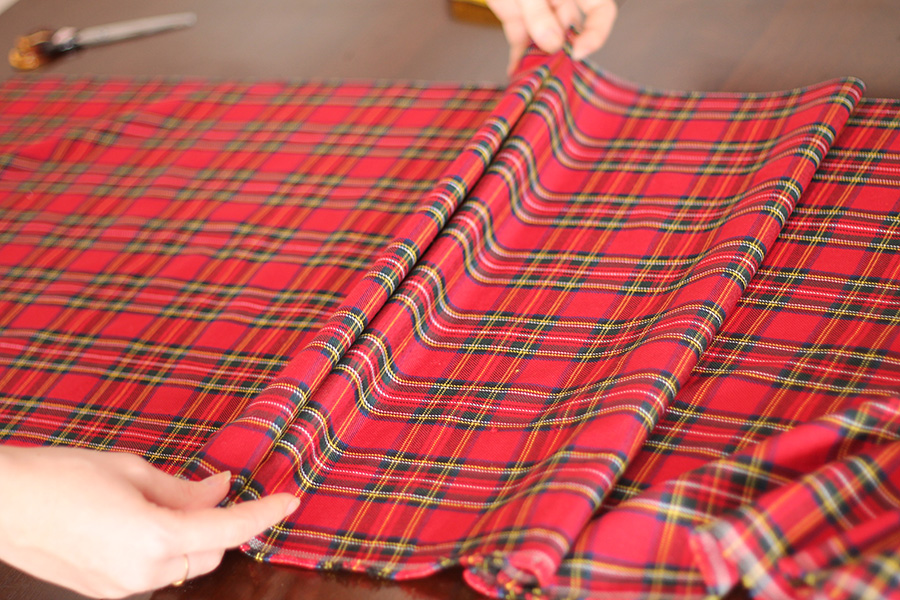
Now begin folding your pleats.
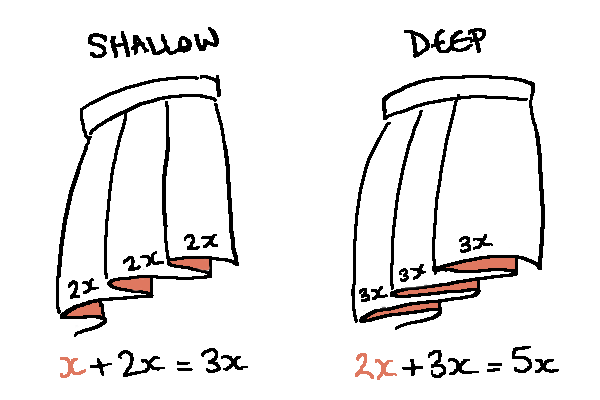
X is the size of your pleats. For shallow knife-pleats, the pattern is 1x, 2x, 1x, 2x. For deep pleats, the pattern is 2x, 3x, 2x, 3x. So for shallow knife pleats that are 1 inch in width (for example), you’d make a marking 1 inch from your seam allowance, then 2 inches from that mark, then 1 inch from that mark, etc.
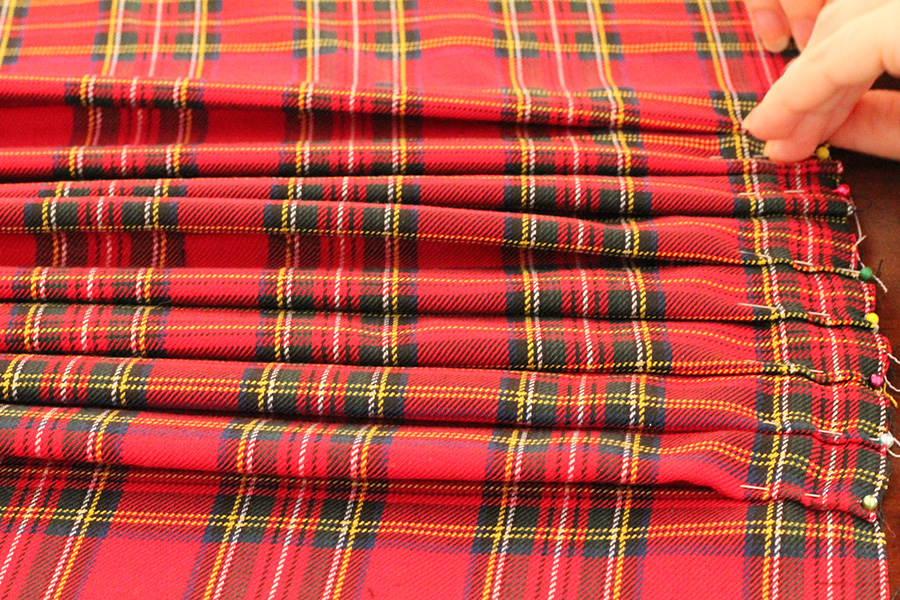
Pin your pleats into place at the waistband. For those going for deep pleats, check both the front and the back to see if the appearance is uniform.. I had to redo a whole section because I accidentally made a shallow pleat halfway through. Ugh!
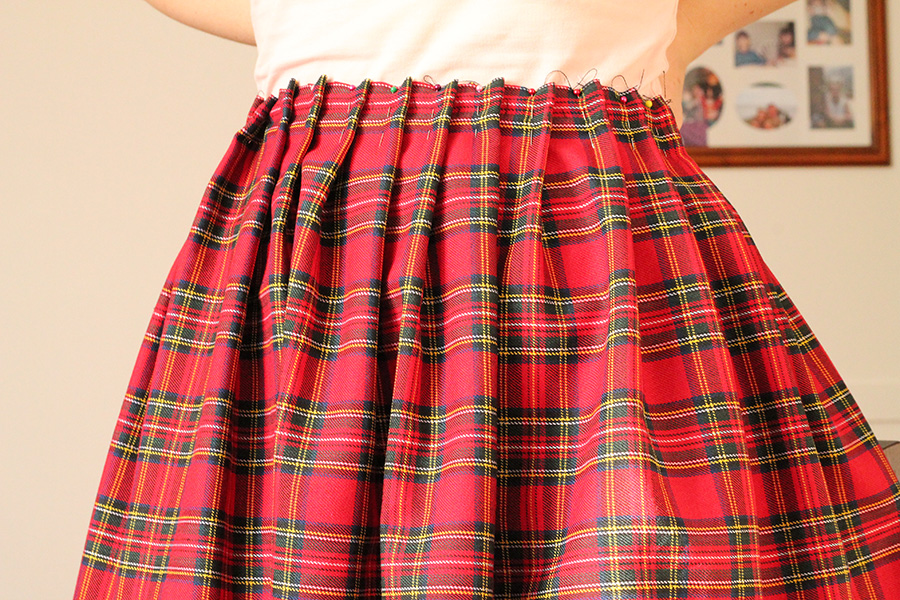
Do what I didn’t do and press your pleats down. It will help them keep their form. I wish I had learned this lesson when I made this skirt. PRESS EVERYTHING.
Before you sew, check that you have enough pleats to go the full circle around your waist. I always err on the side of sewing a couple extra.. you can always use a seam-ripper to undo the surplus pleats afterwards, anyways. Just sew a straight line across all your pleats as neatly as you can.
Here’s a complimentary picture of Hugo to encourage you while you’re sewing.
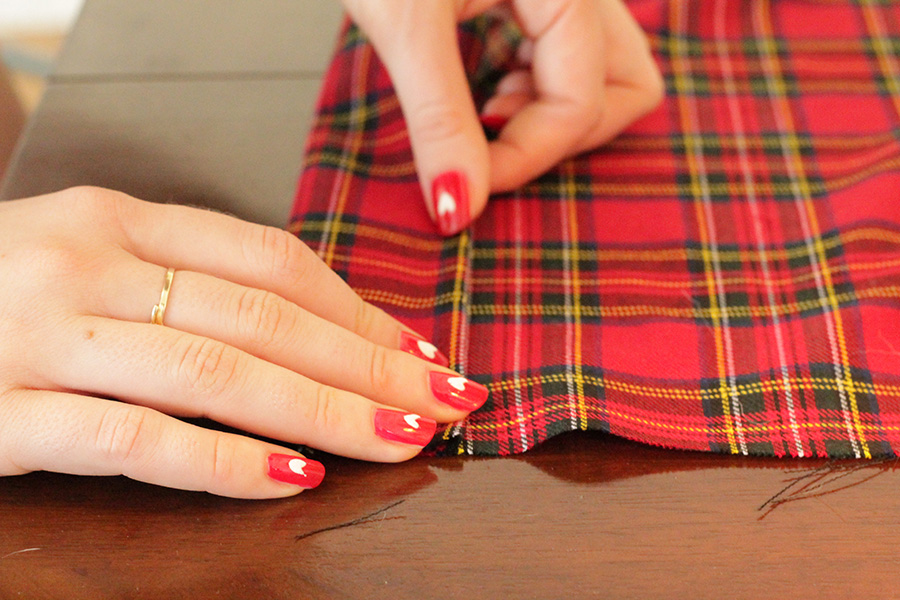
Now we get to your hemline! If you’re not overlocking/serging your hem beforehand, you will need to fold twice to get a neat finish from the inside. Fold once and then again to get your hem to the desired length and press into place. You may want to pin your hem down because if you’re not using a walking foot, your lower layer will get dragged through your machine ever so slightly faster than the top layer.
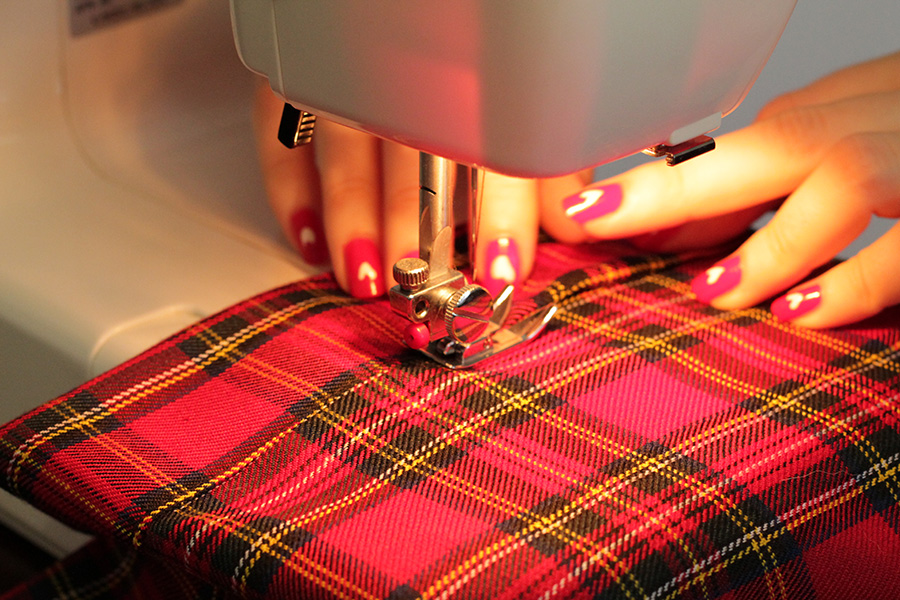
I did the hem at this stage, but personally I would recommend hemming be the absolute very last thing that you do. My fabric was really thick and I don’t have a walking foot so throughout the project, I noticed that the fabric was getting warped and twisted in places as I sewed due to the machine dragging the bottom layer more than the top layer, so I elected to do this step at this stage because I knew I was never going to have a perfect hemline. Mistakes, I’ve made a few.
It’s pretty easy to disguise a straight stitch among the pattern, but I’ll make sure to cover invisible stitching for you guys in a future tutorial sometime.
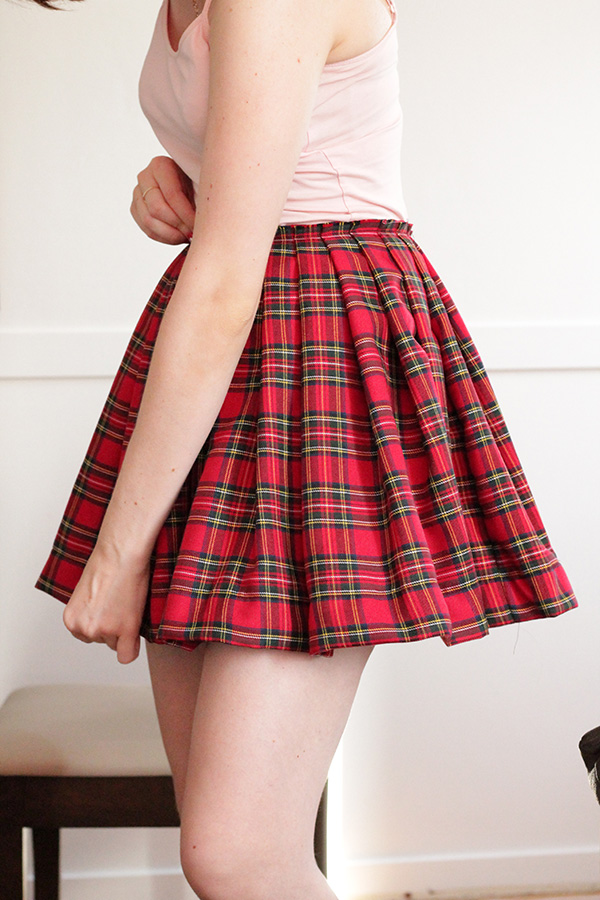
It looks a bit lumpy at this stage because the hemline is so thick, but that’s nothing a bit of pressing won’t fix.
The waistband
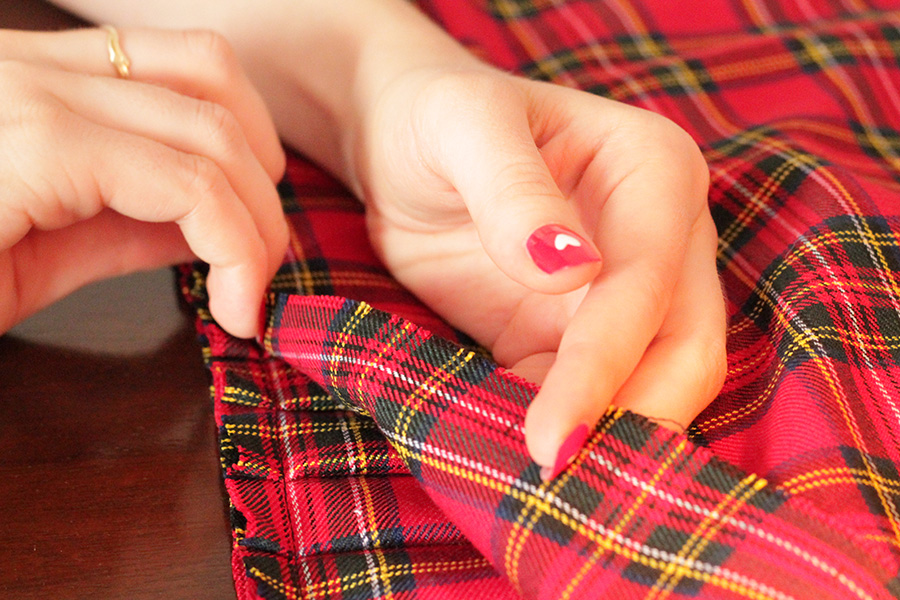
If your fabric isn’t very thick, you will want to interface your waistband beforehand. My fabric was very thick so I left it out.
Lay the fabric for the waistband on your skirt, right sides together and align it with the top of the skirt like pictured above. Sew the skirt and waistband together.
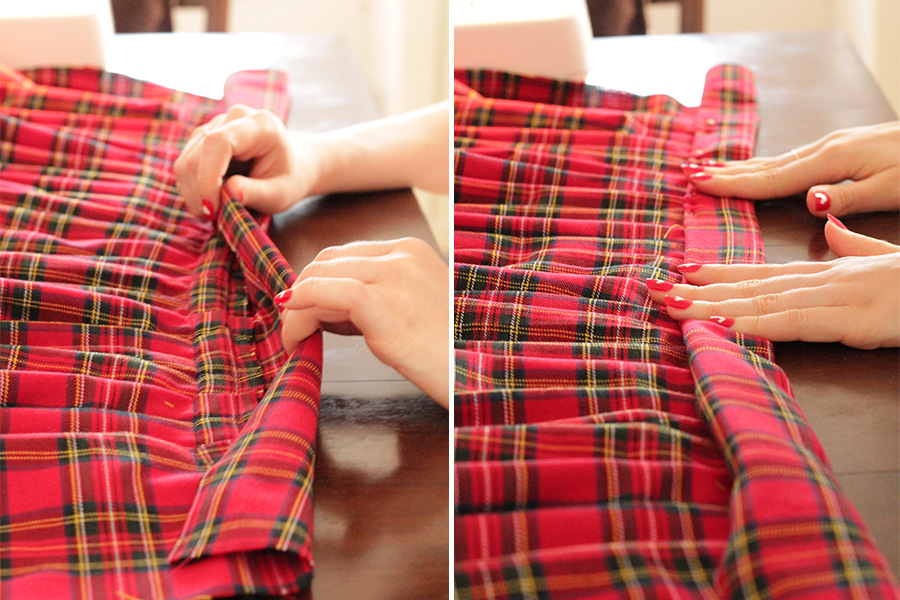
Then flip the skirt over, roll the waistband over, press flat, and pin down that side. Sew from the front of the skirt right where the pleats start under your waistband so you can make that stitch super-invisible, but make sure you’re catching the inside of the waistband with your stitches too, haha.
The zip
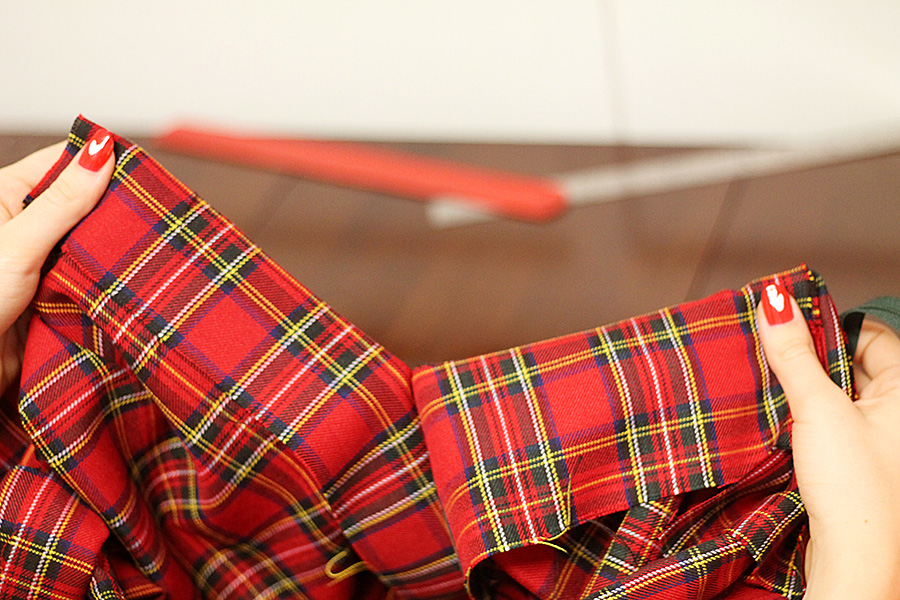
Unpick any paranoia-induced pleats that you added on as extras–just make sure to hold it around your waist to make sure it’s not too big or too small. Then sew your skirt together at the loose ends, excluding the waistband area. For the waistband, you will want to tuck the loose ends of the waistband inward and slipstitch or topstitch the tube closed. You can topstitch all the way around the waistband if you like but make sure your stitching is super precise or it will look home-made.
You’ll want to sew both ends of the skirt together at very specific spot.. You can go all fancy with the zip if you have experience with this and make an invisible zip, blah, blah, but my preferred method is to hide the zip deep between a pleat as shown above. It’s really easy, and when you button or hook up the skirt, the zip will virtually be invisible!
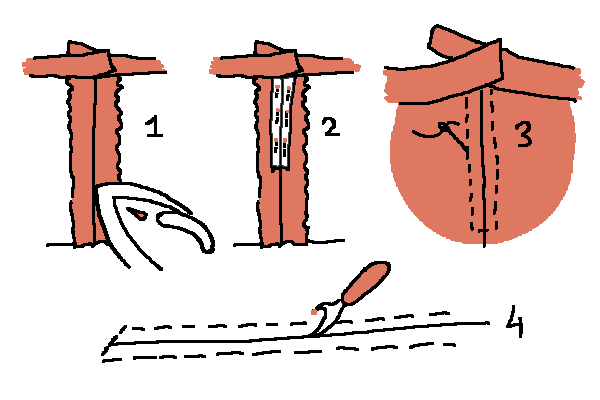
For installing a zip, turn the skirt inside out, and press open your newly-created seam. Lay the zipper face-down so that the teeth are aligned with the seam, pin into place, and then using a zipper foot, stitch around the zip from the right side of the skirt to make sure that the zip stays dead-centre on that seam, removing pins as you go. When you’ve sewn it into place, just unpick the centre seam to the bottom of the zip, thus revealing the zip, and hey presto!
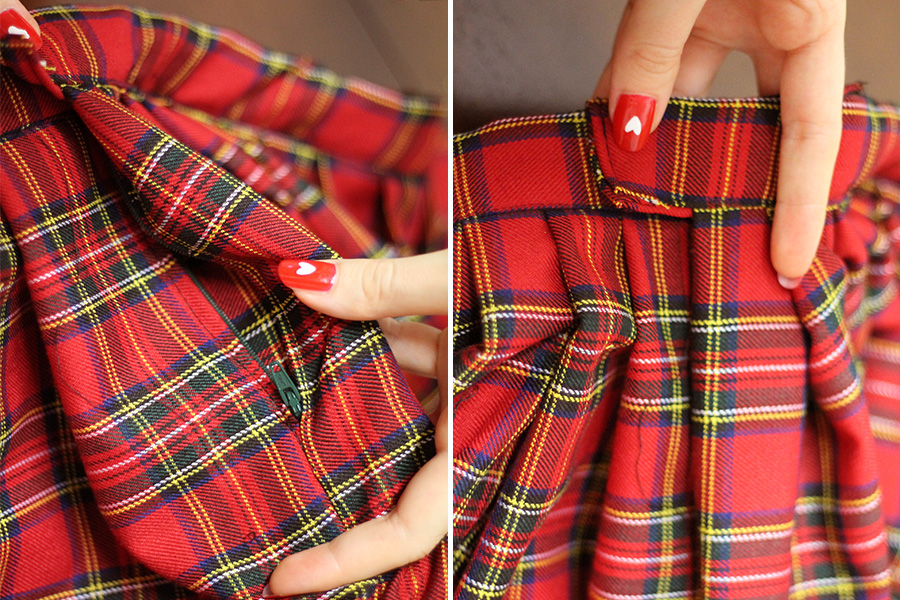
This is what your zip will look like when you’ve installed it. I was going to install a buttonhole but I was running out of time for a costume party, so I just used a strong hook-and-bar closure, which worked out better, I think. If you’re feeling brave, go on and try a buttonhole instead.
Now that you’re finally done, there’s one more step and that’s pressing. Pin down your pleats again and bust out your iron, using the pattern as a guide, if there is one. Crisp pleats make this look, so don’t forget this step!
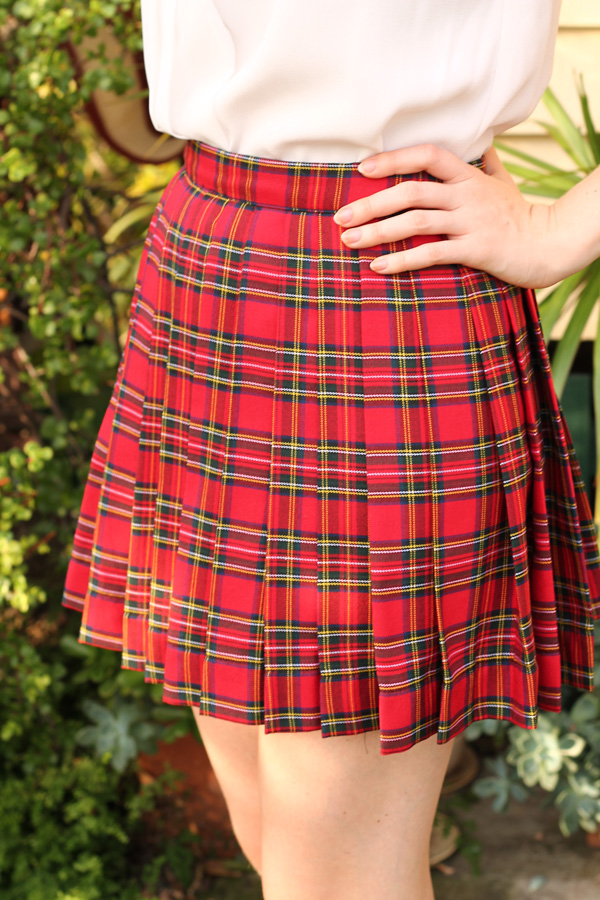
Stand back and enjoy your masterpiece!
Enjoyed this tutorial? Check out my other tutorials and subscribe to my Instagram or Facebook page to keep up-to-date with any new ones I add! And as always, I love getting your ideas for new tutorials, so if there’s anything you’re not sure how to do and Google-fu doesn’t seem to help, give me a shout and I’ll see if I can help.

50 Comments
I always find this school-girl type of skirt cute and sexy at the same time. It reminds me of korean dramas bc Koreans love that skirt style. Plus it really looks good with everything but the problem is I can’t find the perfect one for me. They’re either too short or too loose.
I’m glad I saw your post on how to make my “dream skirt”. There might be some adjustments in measurements but I will not be totally lost now. Plus you also provided the sewing patterns which I’m really REALLY thankful for. I’m going to use woven tartan fabric just like you bc it turns out so well!
Funny how trends come and go – here I am in 2020 coveting a plaid pleated skirt. Here’s to never throwing things away!
oops, forgot we are actually in 2021!
I’m not sure if I’ll ever be willing to accept that plaid pleated skirts are a trend and not a classic staple! ;)
What is the best fabric to use for this? And what kind of fabric did you choose in this article? Like I need type, weight, everything? First time sewer and can’t ever find the fabric I want
Hi! I know this post is from years ago, but I just wanted to ask what weight fabric you would recommend for this patten? I’m debating between a heavyweight Robert Kaufman Big Sur Cotton Canvas
and a medium weight Washed Linen Viscose. This is the first project I’ve tried with pleats so I just want to make sure I get something that works well!
be careful with viscose – its handwash or dry clean only most times, the other option should work just fine!!
Sorry I should really check the messages more often, eek! I think you could use a variety of fabrics but I wouldn’t go too heavy on the fabric, especially if you’re only doing the shallow pleats, because the fabric will not want to crease and will likely stick out in a funny way. The linen viscose sounds like it would work pretty well though!
Thank you so much for this tutorial! I know it’s like 6 years after you posted it, but I just followed it to make my daughter a uniform skirt. You saved us so much money on our limited budget – $25 for 3 skirts’ worth of fabric instead of $34 for one skirt!!
(and it was a fun project, too)
That’s great to hear! And you an tell your daughter that she can officially feel fancy now, wearing a handmade skirt instead of a factory-made one ;)
Hi,
I’m really keen to make this but with top-stitched pleats and a lining. I’m confused by your comment from 3 years ago where you do the top-stitching last, because wouldn’t you want it to continue under the waistband?
Should the lining be pleated the same too? Would it work to just sew the lining and fashion fabric together while they are long straight pieces? I live in a cold climate and all my un-lined skirts I make just creep up my leggings!
I mean it depends how long your topstitching is. You’re not built like a perfect rectangle so generally, you’ll find your hips start to flare immediately from the smallest part of your waist. Which means if you topstitch midway through, you will be securing the pleats to the measurement of your waist, but extended past your waist. You might end up not be able to put your skirt on, you’ll find they won’t fit over your hips. That’s why I’d probably topstitch after the waistband and not press down your pleats until the very end. Topstitching pleats isn’t as straight-forward as it looks.
Don’t pleat your lining, it will sit really funny and add way too much bulk. A simple a-line lining underneath will suffice :)
Hello. I’m also confused about the deep pleats. I don’t understand the 2,3 2,3 pattern or how far apart each marking is supposed to be
It depends on your pleat size :) If you want 1-inch pleats, 1 inch = x. So it would be 2 inches, 3 inches, 2 inches, 3 inches. That means for every 1-inch pleat, there are 5 inches of fabric behind it.
I got confused… how am I supposed to do the deep pleats? n_n’
Same as the shallow ones but with double the fabric behind each pleat.
I don’t get it if I’m trying to do deep pleats the same way as shallow ones they become 2x wide and no x wide… Is this how this supposed to be? Doesn’t it mean me waistband will becoma a lot longer than I measured it?
It will probably be more clear when you start pleating. The pleats look the same size on the outside but have more fabric to the undersides.
Oh gosh, you’ve saved me so much time and hassle! For some reason I’ve never found a good tutorial for pleats and ave just gone off old skirts. Thanks for the skirt algebra and tutorial! Seriously, I haven’t sewn properly in so long and I have a month to make things happen before I go back to uni!
I’m so glad you found the tutorial useful! Hope you make many pretty things :)
Pingback: 10 Fall Skirt Tutorials {Free Patterns}
Thank you so much for this!! I work in a bookstore and I’m going to dress up as Luna for the new Harry Potter book release party we are throwing and I wanted to make a grey skirt for the uniform (sounded way more fun than buying one and probably less expensive). Thanks again!!! :)
Thanks for the tutorial. I wanted to make a pleated skirt around the bottom of a round ottoman that I am re-upholstering so that it would look more tailored. Your tutorial helped me remember the things my mother taught me and it worked out beautifully!
Pingback: DIY knife pleated skirt sewing tutorial – sewing mania club
Thats such a pretty skirt ! I wish I could make it , I can’t really understand patterns tho! All them numbers! Yesterday I make my first skirt without a tape measure and it’s too big lol! Ok so now making this skirt is one of my goals ! Thanks so much for the tutorial you are so beautiful inside and out!
Pingback: 21 DIY Skirt Sewing Tutorials
I made this skirt with deep pleats and the waist measurement is correct, but when I put it on it flares out completely at my hips! My waist is exactly 24 inches but my hips are 33.5 inches. I top stitched the pleats about 4 inches down, and it feels snug at my hipbones and flares out really badly to the point where the pleats flatten out. I really love the look of top stitched pleats, but do you think the top stitches are the problem? I worked so hard on it :(
Top stitching is a funny thing – it won’t help unless you top stitch down in a very certain way. It will likely be how your pleats are ironed, but it’s hard to tell without a picture! :( Feel free to tweet or email me a photo and I’ll see if I can suggest anything.
Love the tutorial, I want to make a tiny one for a Celtic doll I am working on.
That sounds adorable! Show pictures if you do :)
This is so easy to understand! I am about to make a skirt for a cosplay I am about to do and this tutorial will make it a lot easier for me to make my very first costume.
I just started a blog and will certainly link this site when I share about my costume making.
Thank you!
Aww, thank you! I’m glad this tutorial is of use to you :) I can’t wait to see your skirt!
This is wonderful!! Am gona try and brave this tutorial to make me a skirt for my Back-to-School Dinner & Dance!!!!! Hope it works out!!!! Cheerios.
Good luck! I hope you’ll let me see it when you’re done :)
Pingback: Sewing - mirelamerge | Pearltrees
Pingback: Make a Flattering Pleated Skirt
Hello!! I really want to make this skirt and your tutorial makes it look simple enough for someone like me…who has never sewn before. Eek, I know. I just have one concern that maybe you could help me with. I’m rather short at 5’1″, with a 30″ waist and 39 1/2″ hips…Which translates to a big butt lol. If I make the skirt long enough to cover my butt well, it seems that it’ll be too long in the front, which isn’t flattering since I’m so short. (I would like a mid-thigh length) Is there any way to adjust for this? I would like the hemline to be even but also account for the butt. I haven’t made the skirt yet, but according to the math I think it’ll be too short in the back if I don’t adjust somehow. I have found some tutorials on how to adjust a pencil skirt, but this one has pleats so I’m lost. Any help or steering in the right direction would be appreciated! Thank you :)
Hey M! Normally I wouldn’t advise making this kind of skirt in the case of an extreme butt to waist ratio, but yours doesn’t sound that extreme to me. I have a similar ratio (couple of inches smaller than yours) and it didn’t look unusual (and as you see I made it a mini skirt).
I personally wouldn’t worry but if you are unconvinced, try making the skirt a few inches longer and then measure evenly from the ground up to the hemline length you are aiming for. Measuring from the floor up is a legit way to do this to circle and pencil skirts as well. You just have to mark off and finish your hemline a little bit further down the process when your skirt is almost done (as the last step, for example).
what if we want an elastic waistband? that’s also possible right?
I would advise that even if it was possible, it’s probably not a good idea, because you have to figure out a way to keep the structural integrity of the pleats while also allowing them to accordion out as needed. Just a bad idea in general, this skirt really calls for a solid waistband, but you can make an elastic waistband with a gathered skirt or a circle skirt. Pleats just require too much structure unfortunately. :(
Woohoo your skirt is super cute! Love these kinds of self drafted ones that are just a bunch of rectangles – they are so easy.
A trick with waistbands: Sew your waistband piece onto the WRONG side first, then flip over and turn the seam under on the RIGHT side. Edge stitch that and bam, you dont have to worry about catching anything on the other side.
I find this heaps quicker than dicking around with trying to stitch in the ditch and then probably missing bits underneath.
Thanks, Esz! With the waistbands, I sew it specifically like that because I don’t like visible stitches on the outside of the waistband :( I’ve combated the problem with bias binding so now instead of folding it over again, I just make sure that it’s long enough to be comfortably caught. Works much better like that!
Hello!
I just made this, but I was wondering if the pleats will stay through the wash.
Thanks,
Fern
Oooooh, pictures, pretty please? :D You can hard press the pleats, which will help, but otherwise you will always have to re-iron the pleats after a wash. Try not to over-wash it though, skirts and jeans are the sorts of clothes that can go whole seasons without being washed (unless actually visibly dirty or otherwise detected by your nose).
I really like the way your skirt turned out and I really want to use this tutorial but the beginning/pattern was just too darn confusing. Ive been staring at it for 20 minutes and read over everything like 3 times but I can’t figure out when you use the lining (and if you mean extra fabric or interfacing or what?) and how much fabric to get. Also I don’t see you actually sew the 2 pieces together??
Hey Rose, I’m sorry for being confusing! I didn’t use a lining in this skirt, so I probably shouldn’t have included a diagram with a lining.. That’s probably just made you confused. It’s from my box pleated skirt tutorial and that one did include a lining so that’s why it’s in the diagram!
You sew the two panels of the skirt together right after you’ve finished cutting your pieces out, if you have two pieces of fabric – and not just one continuous piece. At the end of the day you just have to have a very long rectangle, whether it’s combined from 1, 2, or 7 pieces of fabric, so long as it’s stitched together into a long rectangle when you begin, it’s all good. If you have any other questions, feel free to respond, or shoot me a tweet or whatever you need and I’ll help you out!
This is so awesome! I’ve been looking for a tutorial exactly like this for so long!!! Thank you :)
Just one question, do you think this same technique would work for making a tennis skirt (like the american apparel style) if I just sewed the pleats down in a a-line shape?
Thank you once again :)
You’re welcome, I loved making it!
I was actually going to topstitch the pleats but I ran out of time. I don’t see a reason why you couldn’t pull it off, although make sure you avoid ironing until the end!
Just finish the skirt as you would above and then at the very last step before ironing, put the skirt on, and start pinning to where the topstitches will end and sew them like that so you can compensate for the flaring of your hips from your waist.
Well, shit. I do not think I have the skills or patience required for this. BUT THIS IS A FRIGGIN GOOD TUTORIAL. I will allow you to make a pleated skirt for me.
IT’S SO EASY, KIRSTEN! Come over one day and we shall brave it together!